Blurry, or more specifically, soft images are a problem for every photographer at some stage. I’m sure you’ve experienced it yourself; you take a photo, check it on your phone’s screen and everything looks great.
But, when you get home and look at the same image on your computer, it looks soft.
So, how can you give yourself the best chance of getting the sharp image you were looking for?
Continue reading and I’ll cover the most common causes of soft images. Many of these are simple to rectify and can make a huge difference to the quality of your final images.
Let’s get into it…
Camera changes to reduce soft images
1. Clean the lens
The first step to reducing the chances of a soft image, is to ensure that the lens of your phone’s camera is clean. Use a microfibre cloth, or lens cleaning wipe to gently clean the lens, because smudges, or ‘pocket dirt’ can cause blurriness.
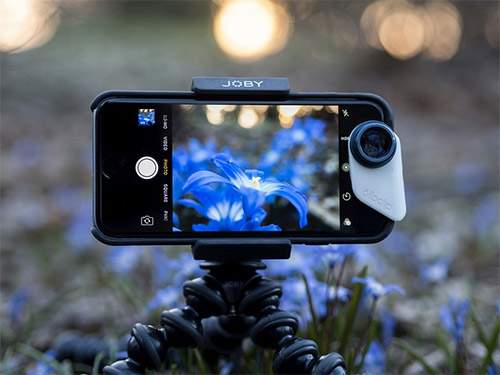
2. Steady your phone
Shaky hands can result in blurry photos. To minimise this, hold your phone with both hands and keep your arms close to your body. Alternatively, consider using a tripod or resting your phone on a stable surface or object.
You could also choose one of the other ways to fire the shutter. There are loads of ways to do it without having to tap the screen.
3. Tap to focus
Most smartphone cameras allow you to tap on the screen to set the focus point. Before taking the photo, tap on the subject or area you want to be in focus. This ensures that the camera focuses correctly and can help reduce blurriness.
4. Use the right shooting mode
Different shooting modes on your phone’s camera app can help in different situations. For example, if you’re capturing a moving subject, try using the “Sports” or “Action” mode, which can help reduce motion blur. Experiment with different shooting modes to see which works best for your specific scenario.
5. Adjust exposure settings
If your photos appear blurry because of low light conditions, adjusting exposure settings can make a difference. Increasing the exposure, or enabling the HDR (High Dynamic Range) mode for example, can help capture more details in challenging lighting situations.
6. Avoid digital zoom
Using digital zoom on your phone will almost always lead to a certain amount of image quality loss, and that can make the photo appear blurry. The computational algorithms in smartphones today can a pretty good job of correcting minor faults, but why take the chance?
Instead, try moving closer to the subject, or consider cropping the photo later to maintain better image quality.
7. Use burst mode
If you’re capturing a moving subject or an action shot, using burst mode can increase your chances of getting a sharp photo. Simply hold down the shutter button, and your phone will capture a series of photos in quick succession. You can then choose the sharpest photo from the burst.
8. Edit with photo editing apps
If you have a blurry photo that you’d like to salvage, you can try using photo editing apps that offer features like sharpening, or clarity adjustments. Both of these can help enhance the sharpness of the image and reduce blurriness to some extent.
Remember, it’s important to manage your expectations. While these tips can help improve the sharpness of your photos, they won’t be able to fix very blurry images. It’s always best to strive for sharpness when capturing the photo initially.
Post processing apps to fix soft images

Here’s how you can fix soft images using the Apple Photos app, Snapseed, and Google Photos:
Using Apple Photos:
1. Open the Photos app on your iPhone or iPad.
2. Locate the blurry photo you want to fix and tap on it to open it.
3. Tap on the “Edit” button at the top right corner of the screen.
4. In the editing toolbar, you’ll find various adjustment tools. Look for the “Sharpen” tool, which looks like a triangle pointing to the right.
5. Tap on the “Sharpen” tool and adjust the intensity by sliding your finger left or right. Be careful not to over-sharpen, as it can introduce artifacts.
6. Once you’re satisfied with the result, tap on “Done” to save the edited photo.
Using Snapseed:
1. Download and open the Snapseed app from the App Store or Google Play Store.
2. Tap on the “Open” button and select the blurry photo you want to fix from your phone’s gallery.
3. Once the photo is loaded, tap on the “Tools” icon at the bottom of the screen.
4. Scroll down and select the “Details” tool.
5. In the “Details” tool, you’ll find options like “Structure,” “Sharpening,” and “Clarity.” Adjust these sliders to improve the sharpness and clarity of the photo.
6. After making adjustments, tap on the checkmark icon to apply the changes.
7. Finally, tap on the “Export” button to save the edited photo back to your phone’s gallery.
Using Google Photos:
1. Open the Google Photos app on your Android device or iPhone.
2. Find the blurry photo you want to fix and tap on it to open it.
3. Tap on the “Edit” button (pencil icon) at the bottom of the screen.
4. In the editing options, you’ll see various adjustment tools. Look for the “Sharpen” tool, which looks like a small triangle pointing to the right.
5. Drag the “Sharpen” slider to the right to increase the sharpness of the photo.
6. Once you’re satisfied with the result, tap on the checkmark icon to save the changes.
Each of these apps provides different editing tools and options, so feel free to explore and experiment with them to find the adjustments that work best for your specific photo. Remember to save a copy of the edited photo separately to preserve the original image if needed.
Final thoughts
Photography apps are good at giving your soft images the appearance of sharpness. But, as with any software, it has its limits.
If you’re getting soft images, it’s a good idea to work your way through the possible solutions above. Take the time to make sure it’s not an issue you can easily solve with a simple change.
If any of the above solve your issue with soft images, let me know in the comments which ones helped 🙂
Steve
Featured image courtesy of Chiemsee2016
StockSnap also kindly provided imagery for this post.