Photography is all about capturing light. And your smartphone camera can tell if there’s bright light, or low light automatically.
They can see the colours of the light going in through the lens, which has an aperture inside. The aperture is the opening that lets that light in.
The light passes through the camera lens, onto the camera sensor. When you press the shutter button on the screen, or use a remote shutter release, the light hitting your camera sensor is digitally captured and saved as an image.
In this article, you’re going to learn what the aperture is, and how you can use it to create artistic exposures.
First, what is exposure?
Well, the exposure is basically how dark, or how bright the final image is. A photo that’s too dark, is called under-exposed. A photo that’s too bright is over-exposed, a photo where your subject is not too dark and not too bright and looks natural, is correctly exposed.

As a beginner, the default ‘Automatic’ mode is very good at getting the exposure right. But, it’s good to learn how to properly expose your photo manually.
So, how do we change our camera settings, so we expose properly? Well, this is done with a few key settings… Aperture, Shutter Speed, and ISO.
And with most smartphones with a ‘pro’ mode, you’ll be able to adjust two of those settings manually. (Aperture is fixed for exposure)
Knowing how your smartphone’s camera works, will help you to take great photos.
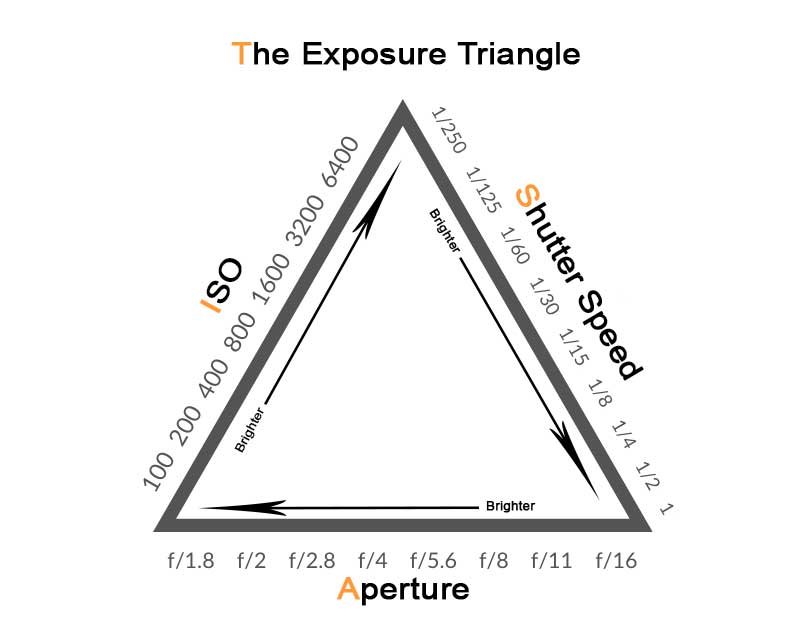
The Exposure Triangle
There are three settings that between them, adjust the overall exposure of your image.
These three settings, aperture, shutter speed and ISO, make up what’s called the exposure triangle. Each setting can make your photo brighter or darker.
This video from Creative Tech Labs explains the exposure triangle simply.
And each setting also affects different aspects of your photo, like the depth of field and motion blur. Things I’ll cover in more depth in future articles.
There’s also one other thing that dramatically changes how bright or dark our photos might be. Can you guess what that is? Yes, the lighting.
Taking a photograph in bright sunlight is a lot different than taking a candle lit scene. Properly exposing, is a balance of the settings in the exposure triangle and understanding how light works. So let’s get started with aperture.
Understanding Aperture
In this article, you’ll learn the basics of what aperture is, and briefly how it affects exposure and depth of field.
Aperture is the first part of the exposure triangle. And it’s the first way your camera controls how much light enters, and is captured on your camera sensor.
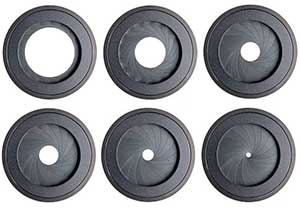 The aperture of your lens is simply a hole that the light enters through. And, much like the pupil in your eye, can go bigger and smaller depending on how bright the light is.
So, Think about what happens to your eye when you turn off the lights. Your pupil gets really big to let in more light, so you can still see. Then, when you go outside in the bright sun, your pupil gets smaller, to let in less light. Your pupil gets bigger and smaller (letting in more, or less light), so that your brain can properly see what’s in front of you.
The aperture on your smartphone camera does exactly the same thing, albeit electronically rather than the physical opening you get on a dSLR camera.
It makes it larger if you think you need more light because the image is too dark, or make it smaller if it’s too bright.
So when you are in a darker location, like shooting inside a building, the camera might want to increase the size of the aperture to expose properly. Similarly, if you’re shooting outside on a sunny day, it might decrease it, to let less light in.
Making these adjustments means that depending on your situation, you can have a perfectly exposed image with different aperture sizes.
The size of the aperture, is measured in f-stops. On a most cameras, you’ll usually see an f-stop range from around f1.4 to f16.
So, what do these numbers actually mean?
The often confusing part about using different apertures, is the numbering system. The smaller the number, the bigger the opening. What this means in practice, is that a setting of f4 has a much bigger opening than an aperture of f16, even though the numbers would suggest the opposite.
It’s easier to understand if you read these numbers as a fraction. ie. f4=1/4 and f16=1/16. When you do that, it easy to see that 1/4 is bigger than 1/16.
The standard aperture sizes on a camera are usually around f2.8 to f16.
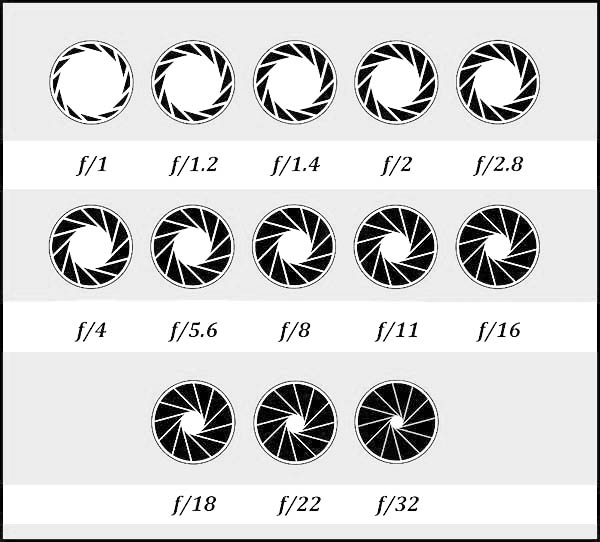
It’s worth remembering though, that not all cameras are created equally. You might find that on your smartphone camera, your lens has an aperture around f1.7.
Okay, now that you understand what aperture is…
Depth of field
As well as changing the amount of light that enters the camera, the aperture has another trick up its sleeve. You can use it to vary the amount of the scene that remains in focus.
A full explanation of depth of field is too long for this introduction to aperture settings. So, I’ll go more deeply into it in a later article. For now, just know that the wider you make the aperture, the less depth in the image will be in focus.
For example, with a wide aperture, an area between around 4 – 6ft (1.5-2m) away from the camera may be in sharp focus. Everything nearer, or further away will be out of focus or ‘blurry’.
If you were to change the aperture to f16, everything from around 3ft to 200ft away would be in sharp focus.
 Once you get into Macro images, your depth of field can be as little as a few millimetres.
This is very helpful to know when you’re taking a specific type of image.
If you’re shooting a portrait photograph outside, there might be a ‘busy’ background. To make that background ‘blurry’, simply open up the aperture.
Alternatively, if you taking a photograph of a mountain range in the distance, you might want everything in focus. So you can close down the aperture and make the opening smaller (higher number), which widens the depth of field in focus.
The good thing about depth of field on a smartphone camera is that it’s done digitally. That means that in most smartphones, you can adjust what’s in focus afterwards if you want to. The software just adjusts the algorithm accordingly.
How do you adjust the aperture?
Because there are so many different smartphone cameras available, it’s impossible to know exactly how adjustments are made on yours. However, many cameras have an ‘Aperture mode’. On your smartphone, it might be called ‘Portrait Mode’. This is usually the simplest way to practice with different aperture sizes.
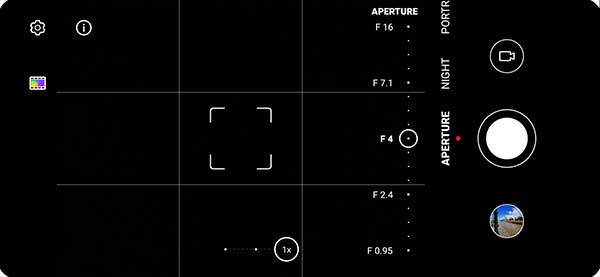
Usually in aperture mode, you’ll have an icon on the screen that tells you the current aperture size. If you tap that icon, often it’ll be replaced with a slider. You can then slide your finger up and down (or left and right) to change the size.
If your smartphone camera doesn’t have this mode, you might find the same controls in the ‘pro’ mode. This mode might be called ‘advanced’, ‘manual’ or ‘expert’ mode, depending on your specific smartphone.
Conclusion
So, there you have it. A brief introduction to Aperture control.
To recap, the bigger the f-number, the smaller the aperture, so less light gets through. This results in a darker image and a greater depth of field.
The smaller the number, the bigger the aperture opening. This results in a brighter image, but with a more shallow depth of field.
All that remains now, is to discover how you can change the aperture on your particular smartphone camera, then go have a play 🙂 If you’d like a couple of ideas, have a read of this article over at the Digital Photography School.
Let me know how you get on in the comments.
