Why is the autofocus on a smartphone camera such a nightmare!
 Mike had got up early to photograph his favourite beach scene at sunrise. He’d taken his tripod and set his smartphone in exactly the right position for the perfect composition.
Then, the square box that displays his point of focus starts to shift all around the screen. One minute it’s on the rock out in the shallows, then it’s on the fence to his left, then on the piece of driftwood in the foreground!
Autofocus was having a hard time.
Mike was confused. He’d always found that the autofocus on a smartphone camera had been great before. Why was this time so different and how could he put it right?
It’s all about the contrast
Auto focus usually works in smartphone cameras, by focussing on the contrast difference in the image.
 Generally speaking, an image is focussed when the line between the light area and the dark area is sharpest. In other words, the level of contrast will be highest in an image when it has a sharp outline and colours are more vivid.
When the image is out-of-focus, the two colours tend to blur into each other.
And this is what causes the autofocus on a smartphone camera to move around the screen, especially in things like landscapes, etc. There’s often several areas of similar contrast differences, so the autofocus on a smartphone camera struggles to decide on which one it should use.
There’s a great article that explains all about smartphone autofocus technologies, over at TheSmartphonePhotographer.com
So, how can we fix it?
Well, the autofocus on your smartphone camera has a helpful trick up its sleeve. You can tell it which part of the image you want to focus on.
Once it knows which piece of the image is most important, it doesn’t look anywhere else and achieves the sharp focus exactly where you want it.
How do I tell it where to focus?
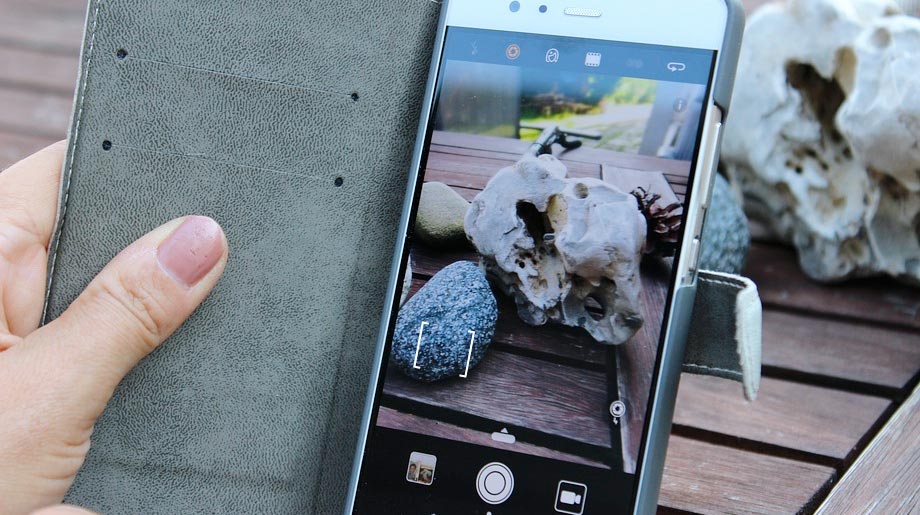
It’s as simple as tapping the screen where you want focus.
In the earlier example, let’s say Mike wanted the piece of driftwood in the foreground to be the main subject.
Simply by tapping the driftwood on the screen would concentrate focus there. The background in the image would be slightly out of focus, giving a ‘dreamy’ effect to the image.
Next steps
Why not practice moving the focus away from what’s expected? See the different effects you can get. Who knows, maybe you can develop a unique style for your photos?
Try tapping the screen in different areas for the same subject, then decide which one you like best later.
Especially if you’re going to print your images later, it’s worth taking a moment just to tap the screen. Even when it looks like the correct area is in focus.
The image may well look great on a 5 inch screen, but when printed at 10 x 8, it might not be so sharp exactly where you want it to be.
As always, experiment and see what works best for you.
Until next time, Happy shooting!
Steve